Sign Update's Managing Director, Martin Hinchliffe had a chance to get to grips with WrapCut fine filament edge cutting tape, courtesy of Paul at www.signmakingtools.co.uk - and he's discovered it's a handy piece of kit to use.
What is it?
For those who aren't familiar with WrapCut, it is a Fine Filament Edge Cutting Tape, which works as a problem-solving tool and method of trimming for the vehicle wrap industry.
WrapCut can be ideally used to make precise trim lines through many printed vinyl and protective film products such as thick film paint and epoxy coatings.
Having spoken to Paul about various possible uses, I thought I should put it to the test by placing down the WrapCut tape to map out our cutting line.
After which I then butted up two pieces of vinyl, which I did by placing the vinyl so that it overlapped the WrapCut tape, I then cut through the two layers and removed the excess.

Step 1:
First I put down theWrapCut tape to map out our cutting line. This is quite pliable and can be shaped into the desired curve quite easily as long as the curve is not too tight.
Step 2:
I then put down the orange vinyl to the right of this line with a little overlap.
Step 3:
Next, I laid down the green vinyl to the left of the line, so that it overlaps the WrapCut tape again.

Step 4:
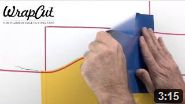
I can now start the cutting by separating the cutting filament from the base or carrier tape in which the filament is embedded on one edge.
The pulling of the filament needs to be done in one long smooth pulling motion. The important bit is the entry cut where you have to hold your thumb over the vinyl to stop it lifting.
Step 5:
I peeled back the green vinyl and removed the overlapping orange vinyl and the carrier component of the WrapCut tape that was underneath this. After that, I laid the green back down and allowed it to butt up next to the orange.
If this was just one layer of vinyl I wouldn't need to peel back the vinyl as the carrier tape can just be pulled out and then the vinyl pushed back down again.


WrapCut Vs Blade
Not as good a finish as a blade, but much better than I expected, and in the close up pictures, you can see it really does give a very good finish.
It is quite simple, but you do need to see the video to understand it properly. You have a lot more control than with a blade, as you can put the tape down and keep moving it until it is right. With a blade you only get one go. The obvious benefit is no blades on the vehicle too.
Typically, with a blade you are pushing into the vinyl so the rough side is the adhesive side. With this the filament is pulling through the vinyl so the rough side is the visible side (where the filament exits). This is the downside but you have to look quite hard to see the roughness, so not really an issue from my point of view.
To learn more about WrapCut, or to buy it for use in your business visit www.signmakingtools.co.uk or call 01952 618069 to speak to Paul.